Layers Sidebar
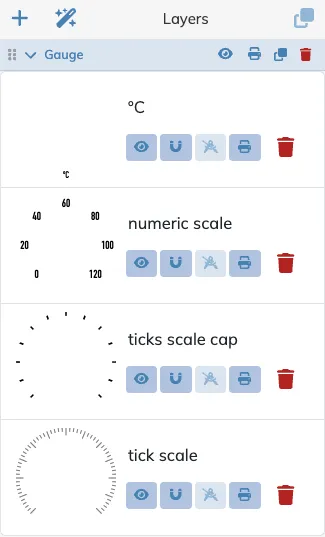
The Layers Sidebar is where you will see all the gauges on your canvas, each with the list of all the layers that make it up. You will find as well any actions related to gauges and layers, like add, duplicate, import or delete.
Licensing
Section titled “Licensing”Some of the features on this page require a subscription, as described on the Login & Subscriptions page:
Standard
Section titled “Standard”Gauges
Section titled “Gauges”Each gauge on the canvas is a collapsible section on the sidebar, with its own layer list, plus a header with the gauge name and its own visibility and printable toggle buttons.
- Toggling visibility or printable on a gauge header does not select or expand that gauge, so you can manage collapsed gauges without losing your current selection.
- Selecting any layer in a gauge scrolls it into view on the sidebar.
- The expanded/collapsed state of each gauge is saved with the file.
The Active Gauge
Section titled “The Active Gauge”At most one gauge is active at any time. Layer editing, the Gauge settings pane, and the layer keyboard shortcuts always act on the active gauge.
To activate a gauge simply click on it, or on any of its layers, on the Canvas, or click its header on the sidebar. The sidebar gauge header and the on-canvas gauge frame header share the same highlight color, so the active gauge is easy to spot in both places. The Up and Down keys also select gauges and layers from the keyboard, see Keyboard Navigation.
Clicking on an empty canvas area will deselect any active layer or gauge, leaving no gauge selected. This will remove the gauge frame and all editing aids allowing you to view a clean canvas with just your gauge designs.
All the gauge management actions below are available from the sidebar’s + dropdown menu, as well as with their own keyboard shortcuts.
Add Gauge
Section titled “Add Gauge”Add Gauge creates a new empty gauge and makes it the active gauge. The new gauge is inserted directly above the selected gauge on the sidebar, and so on top of it on the canvas, or at the top of the list when no gauge is selected, matching how new layers are added.
Duplicate Gauge
Section titled “Duplicate Gauge”Duplicate Gauge creates a full copy of the active gauge. Since this new gauge will overlap the original exactly, the copy will have Copy added to its name so you can tell them apart.
Delete Gauge
Section titled “Delete Gauge”Delete Gauge removes the active gauge.
Import Gauges
Section titled “Import Gauges”Import Gauges loads another .gmpro file and adds all of its gauges to the current canvas, instead of replacing it. Each imported gauge keeps its saved position, and any fonts embedded in the imported file come along too. Imported gauges are appended to the bottom of the list, rendering below existing gauges.
Moving Layers Between Gauges
Section titled “Moving Layers Between Gauges”You can drag and drop any layer from one gauge onto another on the sidebar. The layer will move to the new gauge and be selected in its new home.
Gauge Rendering Order
Section titled “Gauge Rendering Order”Keyboard Navigation
Section titled “Keyboard Navigation”The Layers Sidebar can be navigated from the keyboard, see the Keyboard Shortcuts page for the full reference.
Layer Navigation
Section titled “Layer Navigation”The Up and Down keys step through the visible rows of the sidebar across all gauges. This means the gauge headers and all its layers, while a gauge is expanded, so a collapsed gauge is passed over as a single row. Past the last layer of a gauge, Down lands on the next gauge’s header, and from a gauge’s header, Up lands on the previous gauge’s last visible row. Option/Alt + Up/Down jumps between gauges directly.
Collapsible Gauges
Section titled “Collapsible Gauges”Left collapses the selected gauge’s layer list and Right expands it. Option/Alt + Left/Right collapses or expands every gauge at once, the same as Option/Alt + clicking a gauge’s chevron. The sidebar keeps the selected gauge’s header in view whenever gauges are collapsed or expanded.
Add Layers
Section titled “Add Layers”
Use this button to add a new layer, a drop down menu will display all the available layer types, choose the type you want to add and it will be added right above the currently selected layer, or the top of the list if none is currently selected. The layer creation entries always apply to the active gauge.
For details about each layer type please refer to their corresponding pages:
- Color Arc Layer
- Tickmarks Arc Layer
- Text Arc Layer
- Text Detail Layer
- Image Detail Layer
- Shape Detail Layer
Duplicate Layers
Section titled “Duplicate Layers”
Use this button to create a copy of the currently selected layer, and insert it right above it. Since this new layer will have the same exact radii and angles as the duplicated layer, the new copied layer will have copy added to its name so you can tell them apart.
Sort Layers
Section titled “Sort Layers”You can sort the layers on the list at any time by dragging and dropping the layers to a new location within the layer list. As you drag a layer you will be able to see the targeted location where it will be dropped.
Delete Layers
Section titled “Delete Layers” To delete a layer click on the bin button on the layer cell. This is an instant action, there is no confirmation requested, so if you delete a layer by mistake use
 Undo to restore it.
Layer Toggles
Section titled “Layer Toggles”Visibility
Section titled “Visibility” Press to toggle a layer’s visibility on the canvas.
Snapping
Section titled “Snapping” Press to enable or disable if a layer must be included on layer snapping interactions.
Guides
Section titled “Guides” Press to enable or disable displaying a layer’s radii and angles snap guides.
Printable
Section titled “Printable” Press to enable or disable printing/exporting of a layer.
Selecting Layers
Section titled “Selecting Layers”You can select the layer you want to edit either on the Layers Sidebar list or directly on the Canvas by clicking on the layer to edit.